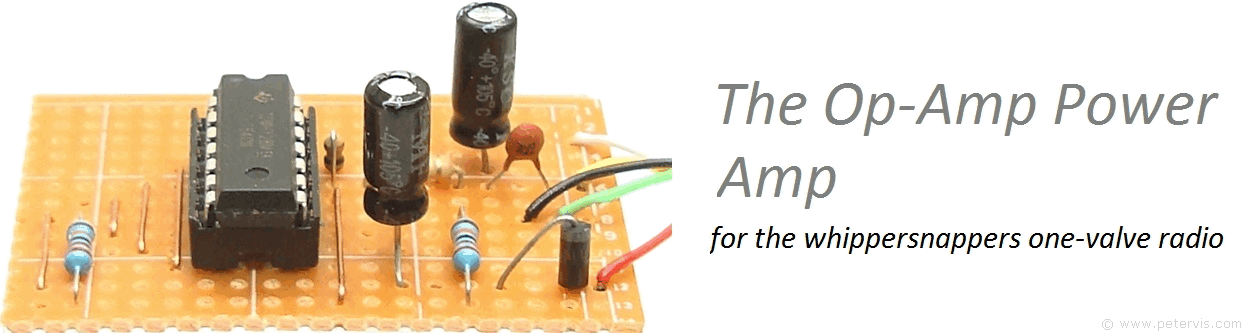
Op-Amp Power Amplifier
An op-amp power amp is a power amplifier made out of operational amplifiers. A single operational amplifier does not usually have sufficient current to drive a loudspeaker, however, what would happen if one were to use a quad package such as the TL084 and connect all the op-amps in parallel? The TL084 is a very low-cost IC (at approximately ten ICs for a pound) making this circuit very cost-effective. One of the experiments I always wanted to make was to see what would happen if I were to connect four operational amplifiers in parallel. Would the total output current be sufficient to drive a small loudspeaker? I designed this circuit for use with the 6j1p One Valve Radio, and the EF50 One Valve Radio projects, in the event that you cannot find a ready-made LM386 SMD module.
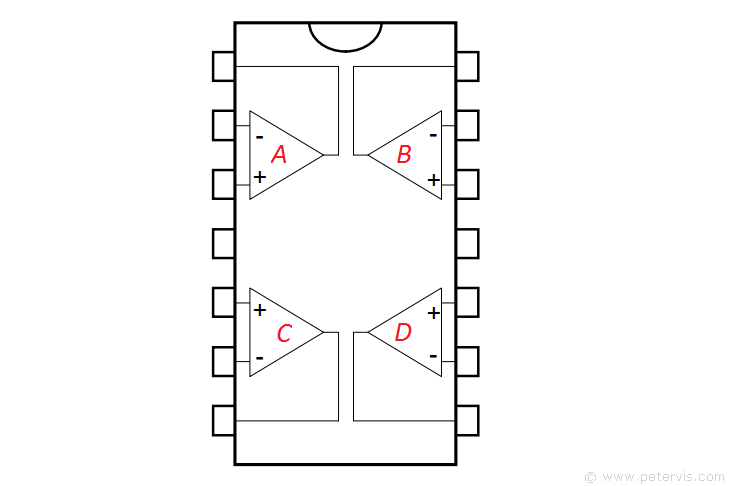
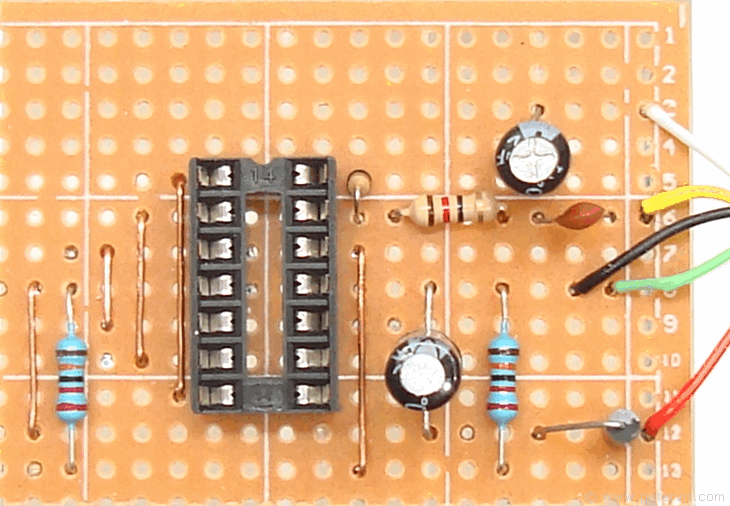
An advantage of this IC is with the mirrored arrangement of the input/output pins. Utilising a strip-board, the copper strips can easily connect the top pair (A and B) of op amps together, and the bottom pairs (C and D) together. We can then use vertical links (shown in blue) to connect the top pair with the bottom pair to end up with all the op-amps connected in parallel. One does however have to cut the copper strip between pin 4 and pin 11, as these are the power and ground planes.
I designed this on solderless breadboard, and got the components just right for it to amplify the RF signals from my one valve radio circuit, and surprisingly it worked very well. I do not believe anyone has ever created a power amplifier in this way before. I then built it on strip board and it works even better. The best speaker to use has to be 8 Ω to 16 Ω in value and full-range type. The nearest stations are ear splitting loud, whilst the slightly distant ones are at moderate volume level.
Circuit
Not all power amplifiers work well with radio circuits, which is the reason why I designed this one. With the LM386 IC, I found that the sound was distorted and the speaker was not very loud. The TDA7052 produced clearer sound, but was not as loud. Surprisingly, this op-amp power amplifier works extremely well with radio circuits. It produces voltage gain, and current gain, and its stability is partly due to the use of negative feedback.
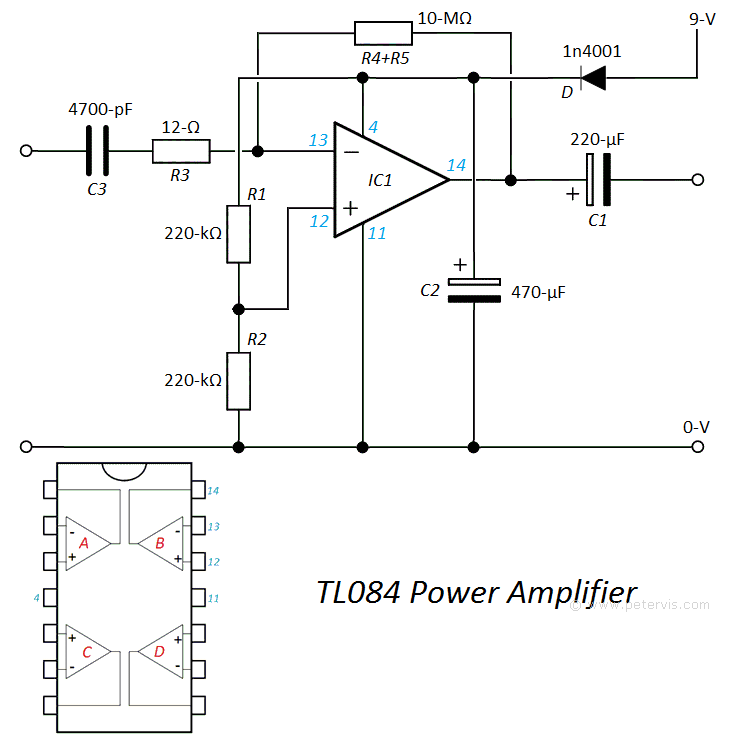
This circuit uses a TL084 IC, which consists of four operational amplifiers. In order to produce the current gain, we connect all four operational amplifiers in parallel. Since this circuit is primarily for my low-voltage one-valve radio circuit, I also needed the gain set to the maximum possible, hence one may use R4 and R5 in series (shown in the build diagram) for the feedback resistor. These would have to be large values and their sum equal to 10 MΩ. Values this high are commonly available and I was able to get ten resistors for a pound from an online site. It is a very straightforward circuit, where the power delivery is through a single rail; consequently, we require the offset at mid rail, achieved by the 220 kΩ resistors in a potential divider circuit.
An advantage of the TL084 is that the operational amplifiers have JFET input with extremely high input resistance, and therefore the 12 kΩ resistor at the input is almost negligible, but I decided to follow convention to keep the maths correct. Whilst testing this circuit with my one-valve radio, I noticed that the value of the 4700 pF capacitor had an effect on cutting the hum, but also AF, hence I had to set a value here for optimum performance. I tested the circuit with a mains power supply, and unfortunately, when we set the gain this high, the audio hum (from some valves) will be noticable. The purpose of the 1N4001 diode is not for protection against polarity reversal but instead to reduce hum from the power supply. The circuit performance is comparable to the SMD LM386 module, and therefore provides an alternative should the module become difficult to find.
The build
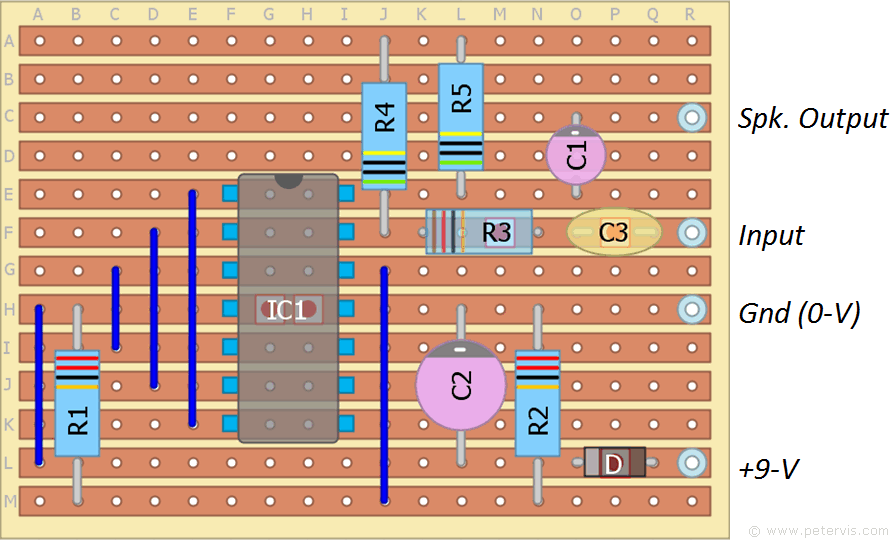
The build is on a small piece of strip board measuring 13-holes (strips) by 18-holes. Only four cuts to the strips will be required. You will need to cut between pin 4 and pin 11 of the IC, between the terminals of R3, between the terminals of C3, and between terminals of the diode if you decide to use it. Remember that R4 and R5 are in series for the feedback resistance. If you are able to find a single 10 MΩ miniature 0.25 W resistor, as I did, then one may connect it directly between pins 13 and 14 of the IC instead of utilising R4 and R5.
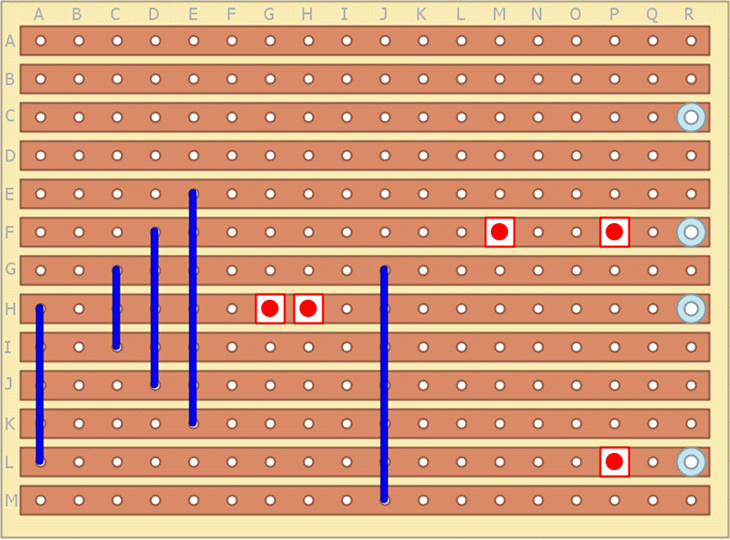
Here is a diagram showing the position of the links and cuts. For the links (shown in blue) avoid the use of long loops of jumper wires, and instead make the links straight and short as shown.
Component List
| Component | Qty | Type | Value |
| R1 | 1 | Resistor | 220-kΩ |
| R2 | 1 | Resistor | 220-kΩ |
| R3 | 1 | Resistor | 12-Ω |
| R4+R5 | 1 | Resistor | 10-MΩ |
| C1 | 1 | Electrolytic Capacitor | 220-µF |
| C2 | 1 | Electrolytic Capacitor | 470-µF |
| C3 | 1 | Ceramic Disc | 4700-pF |
| D | 1 | Rectifier Diode | 1N4001 |
| IC1 | 1 | Quad Operational Amplifier | TL084 |