Raspberry Pi Dead Part 2
If you have a dead Raspberry Pi, or your Pi does not switch on, or power up, then you have some troubleshooting to do to figure out the fault. This guide might also help many who may be experiencing power problems.
Better Safe than Sorry
For breadboard projects, it is always better to use your own power supply, as it will save your Pi in case you make any mistakes on the breadboard. For most of my projects, I always use a 3.3 V regulator instead of tapping the voltage from the GPIO pin.
Never use the GPIO pin 2 to feed power into the Pi, as you will destroy your Pi if you do not know what you are doing. There is a serious risk of damaging it because when you feed power through pin 2 there is no fuse protection to cut the power in case of a short circuit. Your Pi could draw large amounts of current, which will eventually burn the traces on the board. This is a multilayered board and the traces are sandwiched between layers, hence there is no way to repair them.
The Raspberry Pi revision 1 and revision 2 do not have an on-board five-volt regulator, as your power supply should already be providing a regulated 5-volt rail. Instead, these boards have a 3.3 V regulator (R2), which converts whatever the input voltage is (ideally +5 V) to +3.3 V.
Voltage Regulator Failure
The regulator will surely fail if you do stupid things such as feed the GPIO pin 2 with excessively high voltages. Powering it through the mini USB socket and the GPIO pin 2 simultaneously is also a sure way to destroy the Pi. Usually, the main voltage regulator R2 will become very hot, and there will be a smell of something burning such as the traces. There will almost certainly be a short somewhere in the circuit, or possibly even a short within the regulator itself. You will therefore need to remove the short and repair the open traces to get the Pi operating again.
A voltage regulator is a semiconductor device that can fail either short or open. It can short internally between its output pin and ground, or it can short between its input and output pins in which case the voltage at the input pin will be present at its output pin, thus destroying everything on the other side.
The NCP1117-3v3 regulator (RG2) provides +3.3 V to two other sub-system DC-DC converters, RG1 and RG3. These may exhibit a short because they expect 3.3 V at their input terminals, and feeding excessive voltages will damage them.
If RG2 heats up, there could be a short internally, in which case all of the voltage at its input terminal goes to its output pin. If you were stupid enough to supply more than 5 V there, then the high voltage may also end up on the input pins of RG1 and RG3. Therefore, RG1 and RG3 will fail also and they in turn could go short or open.
Voltage Regulator Circuit Diagram
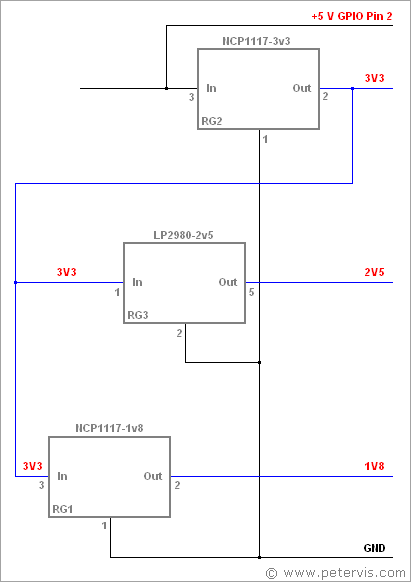
Here is the circuit diagram of the power supply section showing the voltage regulator arrangement. As you can see RG2 converts 5 V to 3.3 V. This 3.3 V line feeds two more voltage regulators RG3 and RG1, which generate the 2.5 V and 1.8 V rails respectively.
Since the regulators are cascaded, troubleshooting is a little difficult for beginners. If RG2 fails then RG1 and RG3 will stop generating their respective voltage rails. However, RG2 protects RG1 and RG3, and ensures that they receive only 3.3 V at their input terminals. If RG2 fails by a short between its pin 3 and pin 2 then the full voltage feeds the input terminals of RG1 and RG3, which will obviously cause damage to them.
BCM2835 Subsystems
The technical circuit diagrams and datasheet of the BCM2835 have not been released yet, and I doubt they ever will, however, from what I can tell, the 2.5 V and 1.8 V rails, are for the exclusive use of the Broadcom BCM2835 processor.
Interestingly, the pins VD0_BAT1 to VD0_BAT4, including VD0BAT2 (A15) of the processor are tied directly to the unregulated five volt rail, thus exposing them to whatever voltage the user feeds the Pi. Normally there is a limit to how high you can take these pins and any voltages higher than 5-volts may damage the processor.
Repairing Raspberry Pi
I managed to buy a faulty board on eBay, being sold as untested, but as soon as I opened the box, I could smell burnt PCB; therefore, I had a good idea of what I received before I even switched it ON. Nevertheless, it was very cheap, and figured it was ideal for experimentation. The board was completely dead, and all I was getting were the power light LEDs. I used similar techniques to repair the board, however here are the general steps one would need in order to troubleshoot a dead board.
Troubleshooting
Firstly, check that +5 V is entering the micro USB socket of the board, and power is present at the main circuits. To find the fault, you will first need to check the voltages present at the input and output pins of RG2. Check for +5 V at the input pin 3 of RG2. If there is no voltage present, then it may be due to a burnt open PCB trace. This could be the most likely reason why voltage is not present at that point. The only reason why the trace would burn in that part of the circuit is if RG2 was short. Therefore, one might replace RG2 first and use a link wire to feed +5 V at its input pin 3. Injecting 5 V there may bring it back to life providing everything else is operating within normal parameters.
If RG2 pin 2 were to provide more than +3.3 V then RG2 is short, and you will need to remove RG2 and replace it with the correct SMD replacement. After replacing RG2, re-check for +3.3 V at its output pin 2. If the replacement RG2 pin 2 shows 0 V and RG2 heats up then the short is further down the circuit at RG1 and RG3. Chances are that they may be short between their input and ground.
If the replacement RG2 pin 2 shows 3.3 V, then check for voltages at the output pins of RG1 and RG3. RG3 Pin 5 should output 2.5 V, RG1 Pin 2 should output 1.8 V. If any of these voltages are missing then replace the relevant regulator. This is how I might approach the troubleshooting. Of course, you might have a better method due to your exceptionally elite private education. Whether you pay thousands of bucks for an education or 16-cents in layover charges at the public library, the laws of physics are the same.
Replacing and Soldering SMD Regulators
Replacing the voltage regulators is easy. The NCP1117-3V3 comes in a DPAK case 369C which is large enough to work with. The NCP1117-1V8 comes in a SOT-223 case, which is also easy to manage. The LP2980-2V5 is a SOT-23 regulator in a DBV0005A style package. This might pose a problem for beginners; however, it is not impossible to replace either.
Make sure you have the correct tools for the job, the right soldering iron tip, desoldering braid, some Omega solder, and a magnifying glass or helping hands. The article on Soldering SMD Guide will help as it contains all the information on soldering this type of component.
Small Error
On the official Raspberry Pi Revision 2 Schematic RPI00022, the pin numbers for the voltage regulators RG1 and RG2 are marked incorrectly. According to the datasheet of the NCP1117 series voltage regulators, pin 1 is ground, pin 2 is output, and pin 3 is input.
The Raspberry Pi Killer
I sometimes get emails from what I call "the Raspberry Pi killer". It is the usual story from a Brit that he was powering his Raspberry Pi through GPIO pin 2. Fed it with more than five volts, and watched his Pi go up in smoke. He killed four boards before realising that he was feeding too much voltage! Obviously, he has more money than sense. I suppose some people have to make many mistakes in order to learn. :-)
Options
If your Pi has passed on, it is deceased, it is no longer working, or it is a non-functional ex-Pi, then look on the bright side, you can now buy the new Raspberry Pi with 512 MiB RAM. If your Pi was dead on arrival (DOA) then the Monty Python Dead Parrot Sketch is the model to use when returning it. However if you have killed the Pi yourself then your warranty is null and void -- as Steve Martin would say -- and you have the following options.
- Sell it on eBay
- Attempt a repair and hope for the best
- Buy a new Pi
Regulator Locations and Parameters
This article continues to the following pages. It shows you the location of the voltage regulators, and their operating parameters, which you could test with a digital meter.
This Article Continues...
Raspberry Pi Dead Part 2NCP1117-3V3 - RG2
NCP1117-1V8 - RG1
LP2980-2V5 - RG3