PCB Prototype Matrix Board 50 mm × 70 mm

A prototyping board is used in the field of electronic engineering to make prototype circuits for testing purposes. This particular one consists of a matrix of copper eyelets (also known as pads), thereby allowing through-hole components to be mounted by soldering. This type of board is much simpler to use than a strip board as there is no requirement to break connections. Circuit connections are usually made using single core copper wire links. Due to the simplicity of their use, they are ideal for beginners and students for simple circuits.
Right Tools for the Job
This type of board works well providing you use the correct tools with it. It is essential to use the correct soldering iron bit, temperature, and solder. Ideally, you should keep the temperature to a minimum otherwise, the eyelets may detach. If you apply too much heat, then you could end up making a mess, and not get anywhere. In addition, when you receive the board, also make sure the copper is clean for soldering.
Making Solder Bridges
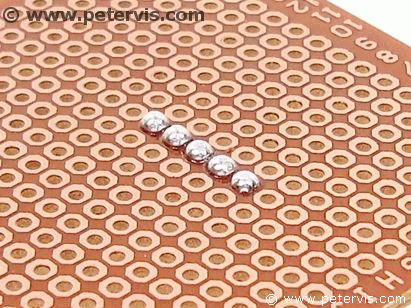
For very short links two to three holes in length, it is possible to make solder bridges. The technique is to put some solder on the eyelets first, and then to join them thus creating a track. There is a limit to how long the line can be, but generally, around five eyelets may join easily. Ideally, you want to keep such a connection to around two to three hole lengths. If you need to have a longr connection, then it is better to use a wire link on the component side. It goes without saying that connections such as this uses slightly more solder than usual, but gets the job done well if you use solder sparingly.
As you can see, it is possible to make a straight neat line of solder. When I am designing a circuit, I tend to keep the connections to a minimum of two copper eyelets.
Avoid Adjacent Bridges
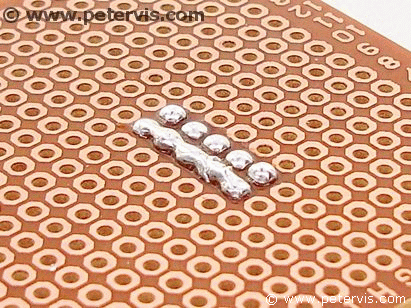
Making two adjacent lines of solder becomes tricky because one needs to make sure that the solder is as thin as possible, and after soldering, you will need to check with a continuity meter to make sure that the adjacent lines are not touching. It is tricky but possible; however, it is best to avoid this in your design.
When you have completed all the soldering, your board will have a lot of flux everywhere. Moreover, the thinking that it looks messy disheartens many beginners. However, you need to use a flux cleaner to remove the flux. This will clean the board and the soldering will look shiny and professional.
Old Soldering Iron

If you have an old high-wattage soldering iron like this with a burnt tip, then it will not work, and you will struggle. You need to have a 17 W pencil soldering iron and anything lower such as 15 W is even better. If you use a more powerful soldering iron, then you may find that the solder may not stick and even worse, the copper eyelets will come off due to the excessive application of heat.
If your soldering iron tip looks like this then you will need to get either another soldering iron or another tip. With a tip like this, you could end up using a lot more solder, none of which will stick to the joins and places where you need it to. Moreover, soldering will become a pain instead of a joy. As you can see, this tip has oxidation marks and there is a layer of oxide on the surface, which behaves as an insulator and prevents the transfer of heat to the join.
In the Electronics Tools section of this site, you can see some of my vintage Antex soldering irons that I use. You will not be able to buy those as they are priceless but it will give you an idea of what to get.
Get a Precision Soldering Iron
For precision work, you need to use a fine tipped soldering iron. Ideally, it should be around 2 mm or less. I use the Antex precision miniature 15 W soldering iron with a 2 mm bit for fine work like this. However, my soldering iron is quite old, I bought it back in the 1980s, and it was expensive then. However today you can get something equally good and cheaper.
Solder
For the solder, you will need cored solder that is lead free and ROHS compliant. Most of the tin solders work fine with this type of boards. If you are an asthmatic, or notice wheezing during soldering then you should get Omega: Rosin and Lead Free Solder, which uses a different flux ingredient and is ideal for asthmatics. With asthma on the rise, and most schoolchildren carrying inhalers it is probably better to get rosin free solder called Omega. Wartons Metals, which is a UK manufacturer of solders, is the only company that I am aware of that makes this type of solder.
Cost
These prototyping boards are currently available from places such as eBay, Amazon, and many electronics shops. I managed to buy ten universal prototyping boards for £1.50 including postage! Use the following search criteria to find dozens of sellers offering these.
"Prototype Paper Experiment Matrix PCB 50 × 70mm"
This is a small board measuring slightly smaller than a credit card, but very useful if you have a theory on paper and you wish to verify it with a quick rough circuit. It is great for building those little temporary projects for operational amplifier gain experiment or learning how to bias a transistor. I placed some orders for these and they generally delivered within two weeks and came from China. Occasionally, the odd one does not get through, but most of the time I have not had any problems, and besides you always get your money back from PayPal if there is an issue.
Related Articles
Antex 18W Soldering Iron CS1Solder for Asthmatics