bigtrak Circuit Hack
I decided to tap directly into the base junctions of the transistors and use my own base resistors for the absolute minimum saturation current. This way the existing base resistors that are there help to minimize up-stream interaction with the controller IC, and I can keep the existing PCB intact and the fully functional.
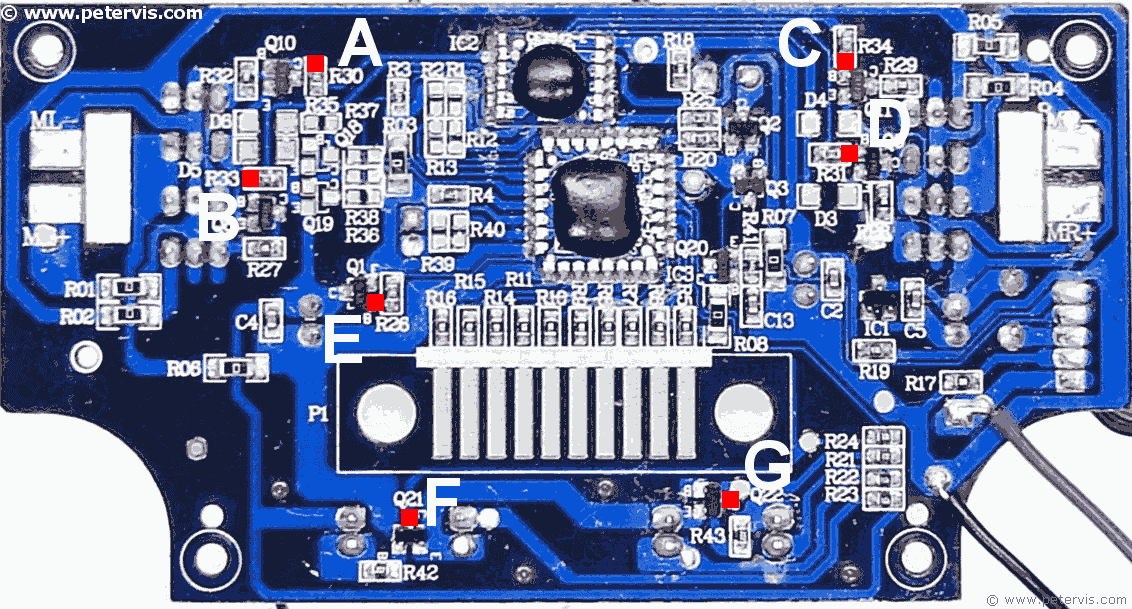
Point A taps directly into the base junction of Q10. A signal at this point generates reverse movement of the left motor.
Point B taps directly into the base junction of Q8. A signal at this point generates forward movement of the left motor.
Point C taps directly into the base junction of Q11. A signal at this point generates reverse movement of the right motor.
Point D taps directly into the base junction of Q9. A signal at this point generates forward movement of the right motor.
Point E switches Q1, and enables the servo encoder circuitry by supplying voltage to it. I decided to tap directly into the base junction of Q1, through my own resistor instead of using R28. This way, I minimize any interaction with the main chip.
Points F and G are for the servo encoder pulses, which are present at the collector junctions of Q21 and Q22 respectively. I used a FET input gate to prevent any loading at these points. This eliminates interaction with the existing circuitry.
This Article Continues...
bigtrakbigtrak Commands
Opening the bigtrak
bigtrak Gearbox
bigtrak Motor
bigtrak Circuit Board
bigtrak Encoder
bigtrak Power Switch
bigtrak Removing the Wheels
bigtrak Facelift - The bigBrit Mod
bigtrak Facelift Modification
bigtrak Circuit Diagram - H Bridge Motor Driver
bigtrak Circuit Diagram - Encoder Servo
bigtrak Circuit Hack
bigtrak Speaker - Battery - LED - Wiring
bigtrak Ribbon Cable
bigtrak With Raspberry Pi
bigtrak Battery Cover and Compartment
bigtrak Front Suspension Mod
bigtrak Modifications Log
bigtrak Painting Wheel Rim Modification
Buying a bigtrak