Crystal Radio Coil Terminals
If your crystal radio does not work then this page might help. One of the main reasons why a crystal radio fails to operate is due to the coil terminals making a poor connection. A radio coil usually has an insulating layer, which requires scraping off at all the terminating ends and preferably tinned with solder. Beginners generally fail to recognise this and therefore the coil makes a poor connection or no connection at all.
If there is an adult present, and if they are capable of using a soldering iron, then one solution is to tin the coil. This will not only strengthen the coil but also ensure a proper electrical contact.
You should also avoid the temptation of winding the coil around the screw terminals, because the coil is likely to break when the screw tightens.
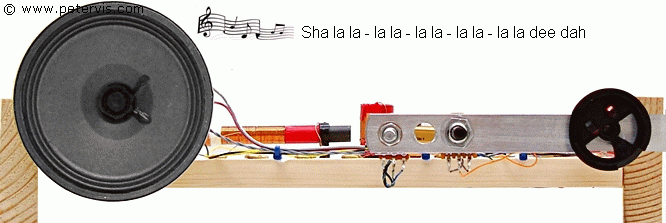
Once the coil terminals are secure under the brass cups, use a continuity meter with the buzzer setting to make sure that the coil terminals are making a proper electrical connection. Check across the coil terminals, and if the continuity meter makes a sound like "Sha la la - la la - la la - la la - la dee dah" - Just like that :-) then it means that the connections are good. However, if the meter makes no sound, then the connections need to be improved.
Soldering to the Cups by an Adult
With my whippersnappers, I noticed that they were undoing the coil terminals and forgetting to make sure that the coil made a proper connection. In addition, the coil is thinner than a component terminal, and therefore sometimes the component terminal will catch first under the screw cup and the coil will remain loose.
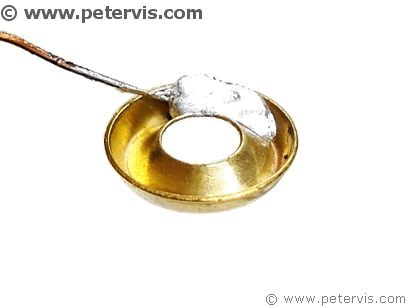
To solve this problem I decided to solder the coil wires under the brass screw cups, which are hollow underneath. Brass solders very easily, and a grown-up with some soldering skills ought to be able to do this part. As you can see, the soldered coil connection is robust and much better.
This Article Continues...
Making a Crystal Radio Electronics LabMaking a Crystal Radio - The Little Whippersnapper's Parts List
Crystal Radio Baseboard 4-inch by 12-inch by 1/2-inch
No. 6 Brass Screw Cups & No. 6 Screws 1/2-inch
Marking Out the Baseboard and Installing the Screws
Making the coil
Crystal Radio Coil
Crystal Radio Coil Winding
Crystal Radio Coil Terminals
Connecting the Crystal Radio Coil
Main parts
Crystal Radio Diode
Germanium Diode Test
Crystal Radio Earphone
Crystal Radio Circuit
Crystal Radio Specification
Optional
Potentiometer Mounting Bracket
RFC - Radio Frequency Choke
Project Power Supply Wiring
10k Potentiometer Wiring
BC549C Lead Extensions for Future Amplifier Projects
Wiring the Speaker to the LT700 Transformer
Credits
The Little Whippersnapper's Radio